By way of an update on the Original PCB search (in case its of interest)..
The game is Space Battle by Hoei International. 1980. Much confusion, not helped by THIS KLOV page which shows a couple of Space Battles.
More on Hoei International HERE, but....
I found the above PCB from @penrhos
The 'speech' PCB was missing. @penrhos to the rescue again! Works! Images above in thread of those boards
"May" have an issue with sound effects being delayed and a bit of screen wobble that I need to look into.
I dumped the ROMs as it wasnt in MAME and its now available for MAME, all Paul Arnolds work, not mine. HERE for download.
I picked up the cabinet from Maidstone. Owner had bought for his grandkids 10 years prior, they couldn't give a toss about it and he was selling as Space Invaders. The instruction cards and CP all said Space Battle. I couldn't find anything about the game while on my phone at the pick up, so I took a flyer on it, thinking very little of it as I was just after a cocktail cabinet for a project refurb. Brought it home to rapturous applause from the wife.
That was back in December 2021, around Christmas eve.. 2 years ago.. Man, time flies..

Pic 2 : You can see the screen garbage.

Pic 3 : It was a little banged up.
It had seen better days. Glass was very scratched, no corner brackets to hold it down. The under glass art work was faded and taped up with sellotape. The edge banding was missing in parts. No coin box, and no back panel. The adjustable feet were missing. CPs scratched to f**k. Seemed to have two different coin mechs. The sticks were heavily grooved where they had been rubbing on the metal CP, making the sticks very wobbly. The machine "felt" curiously unsymmetrical across its width.
So I set about striping it down, lifted the monitor out and took to Grant. More on that monitor in a while. The cause of the symmetry issue? The cabinet had previously been one leg down! Looks like one of its legs had been smashed off. (Maidstone can be tough, you need your whits about you). Previous fix? Make a panel and screw it over the broken area and re-drill. I removed that and found this...

Pic 4 : When I removed the new side panel, this was underneath.
As you would expect it needed some strengthening and inserts to allow M6 bolts. On the inside, the coin box obscures the screws, tricky to solve. I suspect that is why someone didn't fancy having a go at this in the first place. Fair play, it was a PITA.


Pic 5 : The screw inserts going in (the one above was a much bigger hole and needed more work, I used epoxy filler in the end I think. In the second picture you can see the issue inside, difficult. That wooden coin box support did not want to come out, it wasn't a case of simply removing that wooden block on the bottom.
I striped the rest of the inside of the cab clean


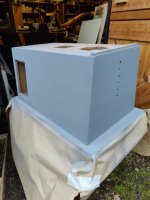
Pic 6 : After cleaning out and sanding the inside. And the before shot
Then it was the usual, fill, sand, prime and paint job that we all know and hate.


The game is Space Battle by Hoei International. 1980. Much confusion, not helped by THIS KLOV page which shows a couple of Space Battles.
More on Hoei International HERE, but....
The PCB that came with the cabinet was DOA, currently being looked at by someone talented.Founded by Japanese businessman Yasushi Matsuda as Hoei International in April 1977. Its poor reputation led to its name being changed to Coreland Technology in 1982, becoming a contractual developer for companies such as Sega. Coreland was majority-acquired by Bandai in 1989 following severe financial difficulties and renamed Banpresto, becoming Bandai's arcade game division.
I found the above PCB from @penrhos
The 'speech' PCB was missing. @penrhos to the rescue again! Works! Images above in thread of those boards
"May" have an issue with sound effects being delayed and a bit of screen wobble that I need to look into.
I dumped the ROMs as it wasnt in MAME and its now available for MAME, all Paul Arnolds work, not mine. HERE for download.
I picked up the cabinet from Maidstone. Owner had bought for his grandkids 10 years prior, they couldn't give a toss about it and he was selling as Space Invaders. The instruction cards and CP all said Space Battle. I couldn't find anything about the game while on my phone at the pick up, so I took a flyer on it, thinking very little of it as I was just after a cocktail cabinet for a project refurb. Brought it home to rapturous applause from the wife.
That was back in December 2021, around Christmas eve.. 2 years ago.. Man, time flies..
Pic 2 : You can see the screen garbage.
Pic 3 : It was a little banged up.
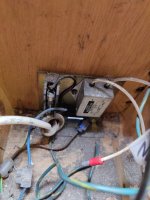
It had seen better days. Glass was very scratched, no corner brackets to hold it down. The under glass art work was faded and taped up with sellotape. The edge banding was missing in parts. No coin box, and no back panel. The adjustable feet were missing. CPs scratched to f**k. Seemed to have two different coin mechs. The sticks were heavily grooved where they had been rubbing on the metal CP, making the sticks very wobbly. The machine "felt" curiously unsymmetrical across its width.
So I set about striping it down, lifted the monitor out and took to Grant. More on that monitor in a while. The cause of the symmetry issue? The cabinet had previously been one leg down! Looks like one of its legs had been smashed off. (Maidstone can be tough, you need your whits about you). Previous fix? Make a panel and screw it over the broken area and re-drill. I removed that and found this...
Pic 4 : When I removed the new side panel, this was underneath.
As you would expect it needed some strengthening and inserts to allow M6 bolts. On the inside, the coin box obscures the screws, tricky to solve. I suspect that is why someone didn't fancy having a go at this in the first place. Fair play, it was a PITA.
Pic 5 : The screw inserts going in (the one above was a much bigger hole and needed more work, I used epoxy filler in the end I think. In the second picture you can see the issue inside, difficult. That wooden coin box support did not want to come out, it wasn't a case of simply removing that wooden block on the bottom.
I striped the rest of the inside of the cab clean
Pic 6 : After cleaning out and sanding the inside. And the before shot
Then it was the usual, fill, sand, prime and paint job that we all know and hate.
Attachments

Last edited by a moderator:


") . But thankfully now 'more' fixed. You can also see the new trim for the edge in this shot. 25mm annoyingly. But this stuff does the trick, if a little sketchy round the outer corners at the moment.
. But thankfully now 'more' fixed. You can also see the new trim for the edge in this shot. 25mm annoyingly. But this stuff does the trick, if a little sketchy round the outer corners at the moment.