DIY Pi2Jpac Jamma Adapter

virtvic

The Cabaret King
Feedback
21 (96%)
Credits
1,983CR
Can I just point out to everyone on this thread that pi2jamma has NOTHING to do with me or the diy jamma + pi thing I created in the first place.

Maybe start another thread singing the praises / moaning about the actual pi2jamma product?
 

deanzor

Active member
vacBacker
Feedback
2 (100%)
Credits
139CR
Big thanks to Chunksin for the Pi2Jamma Thingy - made the whole experience of getting to play Progear on my DK cab pretty much plug and play*

*apart from me not understanding how to get out of the service menu, LOL

Cheers sir
smiley32.gif
 

Flinnster

The Dino King
vacBacker
Feedback
29 (100%)
Credits
2,566CR
Well this weekend I built another homebrew pi board.
Thanks to Vic for passing some excellent panels to me at Smarty's meet a while ago.

I used one of these, but added more holes for power, speaker wiring, and added a rectangular cutout for a power rocker switch:

vic1-piboard0.jpg


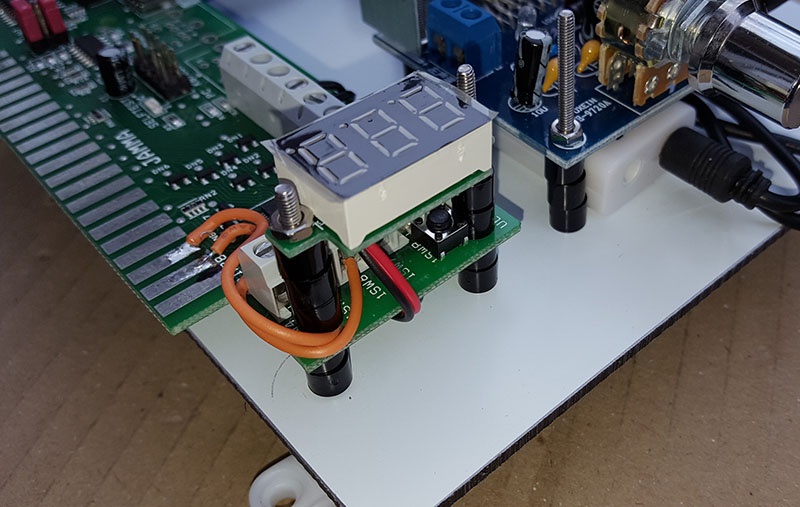
I then modded the JPAC to support 'CHAMMA' (6 buttons for both players), and added a voltmeter to it. Soldered 12v wires for the audio amp too:

vic1-piboard1.jpg


Once that was done, it was just a case of assembling, feeding all the wires through, adding the power wires etc:
vic1-piboard2.jpg


So my 'VicPi+' jamma board has the on/off rocker switch on the left, and on the right a voltmeter, and a concealed service button to access the change game menus underneath it:

vic1-piboard-done.jpg

vic1-voltmeter_switch_audiodongle.jpg


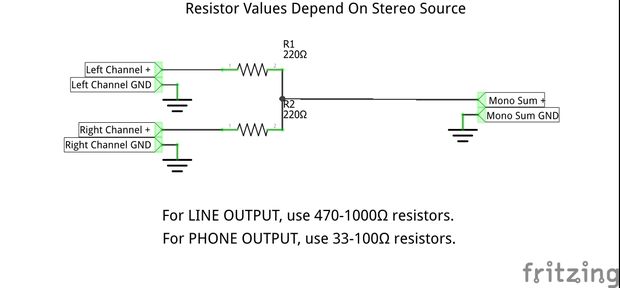
The final bit I want to look at now, is the audio stereo to mono downmixer circuit, for in between the audio amp and the jpac.

Currently only the left speaker is wired, which is fine for mono games, but on any with stereo I have to keep messing with the mame settings to set the sound system back to mono. This also then screws up the stereo output from the audio dongle, if I wish to plug in stereo headphones or connect the board to a cab with stereo phono cables later on...

Current wiring:
Audio_Current.jpg


Possible new wiring?
Audio_Downmixer.jpg


Scratching my head a bit about how to deal with the audio grounds or 'speaker -' terminals.
The diagram above conveniently has them going to ground, but on jamma audio, and the audio amp, neither ground or each - channel terminal have continuity - they are all independent.

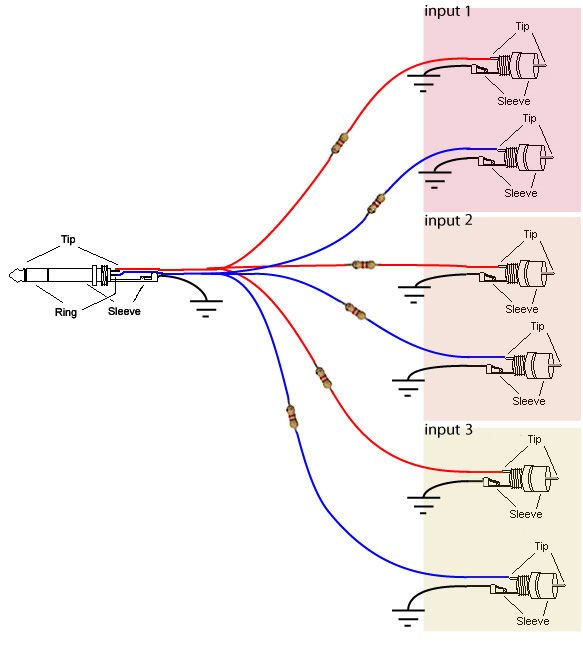
So... I searched further and found this:
audio-resistors-on-each-line.jpg

Seems to make a fair bit more sense.. so I need resistors on each line, both +ve and -ve speaker wires.

But.. all these diagrams are for non-amplified 'line' level audio, or headphone level audio.
I of course want to to this with pre-amplified signals.

So the 'output' from the amp (input to this system) is a max of 15W-25W (peak) per channel, which is designed for two 4-8ohm 10-50W speakers.
Here's the one I'm using

In reality I want to mix this into a single channel, which drives a single 8ohm 10W speaker.

On a single channel currently I rarely dial-up the amplifier pot more than 1/2 way, so it's clearly got enough punch on a single channel to be -very loud-.

If I go too high with resistor values.. ie putting 1000ohm resistors on the channel lines.. would I then be straining the amplifier, trying put amplified audio through a resistor value specced for 'line output'?

Confused, haylp!!
smiley5.gif


Flinnster2018-09-09 16:41:32
 

Flinnster

The Dino King
vacBacker
Feedback
29 (100%)
Credits
2,566CR
Ah nice, and you get no issues on that?
smiley4.gif
I guess that's linking L & R speaker positive terminals then? I'll do a multimeter test on those solder points to check - cheers!
smiley20.gif
 

DanP

Administrator
Staff member
vacBacker
Feedback
5 (100%)
Credits
2,192CR
Chunksin said:
The Facebook link is for pi2jamma hardware so it uses a gert666 rather than an hdmi to VGA adaptor. You can mod it to disable the pikeyd driver and run it using a gert666 or VGA hat and a jpac, it runs great and is the codebase for the new version I'm working on that'll be compatible with the new pi 3b+. The version 5.2 was kind of the end of the line, it was way too cumbersome to update, the new version has a universal resolution switcher script based on the pi2jamma approach

Just trying to finish my 2nd pi2jamma setup and spent a bit more time reading back to see if there was an updated version since I started it months ago. Does the above mean there won't be any more updated images from you Chunksin? Not pushing/insinuating/judging/etc, just after a steer on how to keep my setups updated :) IF this is the case, would you mind doing a quick n dirty doco on how to use the pi2jamma image, how to modify it as you suggest so that it will work with the VGA thing to JPAC. Bear in mind I'm not of Facebook so don't keep upto date with whatever's on there.

Cheers and thanks for all the hard work!

Dan
 

chunksin

Active member
vacBacker
Feedback
21 (100%)
Credits
733CR
Hi Dan, there will be a shiny new build coming in hopefully October, pi3b+ compatible and running the latest resolution switching scripts and some new themes, if Ben Templeton's work turns out as expected it'll mean Retroarch will do auto resolution out of the box which will be a game changer! Most of the work is already done to the new v6 image but it needs a fair bit of tweaking yet.

I've just had a boat load of projects to finish, the last of which will complete this week as they're for vaccers going to the meet
smiley1.gif
 

virtvic

The Cabaret King
Feedback
21 (96%)
Credits
1,983CR
I'm getting a bit confused with the difference between the Arcade Forge Pi2Jamma software and the pi & jpac thingy that I originally started this thread about.

I need to download an image for my pi again n(and can't seem to find it), as my horizontal setup has freaked out and doesn't want to work anymore. I'll just reburn the image and hopefully everything will be tickety boo again.

It was Rich's awesome build with Attract Mode as the very simple but brilliant frontend. Had the pink n blue 'Arcade Pi Thingy' logo at the start
smiley16.gif
 

Flinnster

The Dino King
vacBacker
Feedback
29 (100%)
Credits
2,566CR
I've uploaded an image for vik to let him try out. It's from feb 2018.
New version is being worked on .. but is still to undergo some testing. The hope is it'll have better video mode switching and be compatible with rasp pi 3b+.
Hold tite folks ;)
 

chunksin

Active member
vacBacker
Feedback
21 (100%)
Credits
733CR
It's getting there, had a slight distraction working on the groovymame build, couple more days and that will be done and dusted then back to the pi stuff
smiley20.gif
 

ace5

Active member
Feedback
2 (100%)
Credits
17CR
Hi chunksin how's the new pi image coming along, I know you've been busy with the read only windows don't want to push you just bumping up the thread
 

chunksin

Active member
vacBacker
Feedback
21 (100%)
Credits
733CR
Hi all,

Thanks for your patience and apologies for the delays, I've finally got time to crack on with the Pi image, quick update, B+ support successfully added after a lot of hassle (I hate Linux filesystems!) - I've had a partly working B+ image for some time but the network didn't work which for me was a killer as it meant constant switching between B and B+ to work on the back end.

More updates to come as progress made, I'll upload the new v5.3 B+ image over the weekend.

bplus.jpg


bplus2.jpg
 

Flinnster

The Dino King
vacBacker
Feedback
29 (100%)
Credits
2,566CR
Very nice MrChunks!
smiley20.gif


From my side:

- New raspb 3A+ model.. same stuff as the 3B+, but half the memory and less USB ports. Need to do some memory tests on this shiz and see if the 3B+ image uses up all the memory available or if it might work on the smaller / cheaper model (it's only £10 cheaper tho..)

- Audio hardware downmix circuit. Zipper's mod to the base of the audio amp to short the outputs does work-ish. It's a 'get you up and running' solution but I definitely hear wierdness on the mono output from stereo music in games where both channels are doing stuff that effectively cancels them out. So I still need to do my stereo downmix circuit with inline switchable headphone socket.

I just haven't got round to it yet!

- Analog inputs! After being badgered politely by a number of Sega cab owners (you know who you are
smiley2.gif
) some discussions were had this weekend about getting Sega steering and pedal pot info read into mame on the pi to properly enable pi emulation for games like Outrun, Powerdrift, and possibly Space Harrier, Afterburner, Super Hang On, Hang On, & Enduro Racer.

I can't see a proof of concept rig with a bunch of pots being too hard to get up and running - but the aim is to get a seamless loom created from a pi that wires directly into sega cab headers (IDE and molex style) with no splicing of any wires needed whatsoever.
 

chunksin

Active member
vacBacker
Feedback
21 (100%)
Credits
733CR
Here is the new v5.3 image, it has a couple of bug fixes in the service menu and the usb lag reduction config. I dialled down the overclock as I found it wouldn't boot on one of my 3B pis, you can edit the /boot/config.txt file to increase it. Check the overclock section, remove the hash at the start of the line to make the 3B+ settings active and add a hash to the 3B lines.

5.3 Download
 
Top