

I've wanted to learn about using CPLDs for a lot of years but never really got round to it until now. The main reason for me doing it now was that (despite still being advertised on a well-known US arcade parts supplier's website), the single chip VRA and SBC replacements for Pacman have been unavailable for years, and the big SBC daughterboard gets in the way of my Pacman high score save kit. And while I was at it I thought I might as well try to get the VRA done too. Both the big SBC and VRA boards are easily damaged by plugging them in the wrong way round, and they are very often missing when you get a Pacman/Ms Pacman PCB.
What's the SBC? It's the sync bus controller which interfaces external devices to the CPU.
What's the VRA? It's the VRAM addresser which determines the address to be accessed by the video output circuitry based on values of horizontal and vertical timing.
So a few days of learning, the CPLD carrier and JTAG interface board designed and delivered from China and just this week I've got it all to work.
I've built the carrier boards to work with Microchip/Atmel ATF15xxAS series 44-pin CPLDs. Attached are photos of the 2 boards built. Even though the CPLD itself is small, TQFP format, it's quite easy to hand-solder, just make sure you use a lot of flux then check with a magnifying glass for any shorts. The only other component shown is a Schottky diode for reverse-voltage protection, and there's space for an optional capacitor if needed.
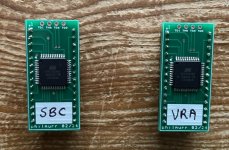
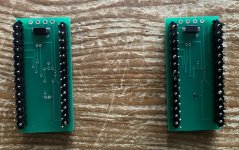
Turns out the VRA will fit into a ATF1502AS but the SBC is a bit too big and needs an ATF1504AS with its extra macrocells. Handily though they both have the same pinout so both fit on the carrier board.
So once the code is compiled it needs programming to the boards. That's where the 4 connections at the top of the carrier board are used, the JTAG interface. I designed another board to be the interface between the CPLD boards and the Microchip JTAG programmer - photo below (including 5V power supply that is needed). The CPLD board just plugs in and can be programmed/erased/reprogrammed until the final design works. You only need one JTAG interface board as it's reusable.

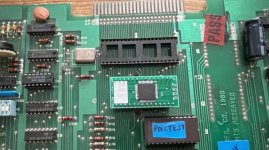
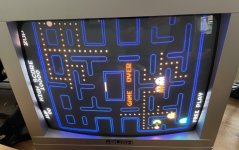
So that's about it, I now have a working Pacman board with high score save and my own replacement VRA and SBC boards. Photos below. showing the SBC (installed next to the CPU socket which is where the high score save kit plugs in) and Pacman running perfectly.
The CPLD module can be used for recreating other custom chips that I may start experimenting with, along the same lines as the excellent work @NivagSwerdna has been doing with Konami customs.
I won't be selling assembled boards, but I will put up a separate for-sale thread for bare boards if anyone wants some to experiment with.
What's the SBC? It's the sync bus controller which interfaces external devices to the CPU.
What's the VRA? It's the VRAM addresser which determines the address to be accessed by the video output circuitry based on values of horizontal and vertical timing.
So a few days of learning, the CPLD carrier and JTAG interface board designed and delivered from China and just this week I've got it all to work.
I've built the carrier boards to work with Microchip/Atmel ATF15xxAS series 44-pin CPLDs. Attached are photos of the 2 boards built. Even though the CPLD itself is small, TQFP format, it's quite easy to hand-solder, just make sure you use a lot of flux then check with a magnifying glass for any shorts. The only other component shown is a Schottky diode for reverse-voltage protection, and there's space for an optional capacitor if needed.
Turns out the VRA will fit into a ATF1502AS but the SBC is a bit too big and needs an ATF1504AS with its extra macrocells. Handily though they both have the same pinout so both fit on the carrier board.
So once the code is compiled it needs programming to the boards. That's where the 4 connections at the top of the carrier board are used, the JTAG interface. I designed another board to be the interface between the CPLD boards and the Microchip JTAG programmer - photo below (including 5V power supply that is needed). The CPLD board just plugs in and can be programmed/erased/reprogrammed until the final design works. You only need one JTAG interface board as it's reusable.
So that's about it, I now have a working Pacman board with high score save and my own replacement VRA and SBC boards. Photos below. showing the SBC (installed next to the CPU socket which is where the high score save kit plugs in) and Pacman running perfectly.
The CPLD module can be used for recreating other custom chips that I may start experimenting with, along the same lines as the excellent work @NivagSwerdna has been doing with Konami customs.
I won't be selling assembled boards, but I will put up a separate for-sale thread for bare boards if anyone wants some to experiment with.


