
You are using an out of date browser. It may not display this or other websites correctly.
You should upgrade or use an alternative browser.
You should upgrade or use an alternative browser.
Plug 'n' Play TV games
- Thread starter 2huwman
- Start date


Apietoteae
Newbie
- Credits
- 1CR
Hi everyone!!
I have the PAL Street Fighter Mega Drive model, and I'd love to convert it to 60 Hz. I already tried replacing the crystal oscillator, but unfortunately it didn't work.
Does anyone know how to mod this particular Mega Drive model to run at 60 Hz?
A while ago I got really into modding the Sega Radica Mega Drive, and I managed to add true stereo audio as well as improve the overall sound quality.
Tomorrow I'll post the schematics in case anyone is interested in trying these mods.
I have the PAL Street Fighter Mega Drive model, and I'd love to convert it to 60 Hz. I already tried replacing the crystal oscillator, but unfortunately it didn't work.
Does anyone know how to mod this particular Mega Drive model to run at 60 Hz?
A while ago I got really into modding the Sega Radica Mega Drive, and I managed to add true stereo audio as well as improve the overall sound quality.
Tomorrow I'll post the schematics in case anyone is interested in trying these mods.
Apietoteae
Newbie
- Credits
- 1CR
Hi again!Those schematics would be great thanks! I've had no luck modding SF. I just stretch the image on my pvm and play it at one of the higher speed levels!
I have to admit that, when I was a teenager, I became absolutely obsessed with the Radica Sega Mega Drive handheld version of Street Fighter hahaha.
I ended up making a huge number of mods for it, and I documented all of them on this website.
They're all written in Spanish (greetings from Spain!), but I'm going to translate them into English in case anyone would like to apply these modifications to their own consoles.
A user created a mod that enables true stereo output on this console. By default, the left and right audio channels are mixed together, which introduces audible distortion.
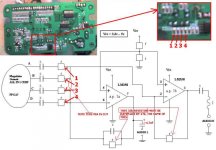
The red lines indicate the copper traces. You will need to cut the trace between resistors R2 and R3. The resistor highlighted in blue should be replaced with a 10-ohm resistor.
Next, solder a wire from pin 2 of the audio chip to R2, as shown in the image. You will also need to solder a wire to pin 7 (OUT), which will serve as the second stereo channel.
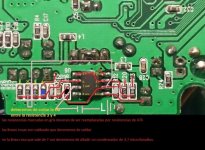
Ideally, the two stereo channels should be created without replacing the original 47 kΩ resistors, with the exception of the resistor highlighted in blue.
The red lines indicate the copper traces. You will need to cut the trace between resistors R2 and R3. The resistor highlighted in blue should be replaced with a 10-ohm resistor.
Next, solder a wire from pin 2 of the audio chip to R2, as shown in the image. You will also need to solder a wire to pin 7 (OUT), which will serve as the second stereo channel.
Notes and suggestions about the stereo mod
After replacing the resistors according to the diagram above, you may notice a significant reduction in the overall audio volume, making the Mini Sega sound noticeably quieter.Ideally, the two stereo channels should be created without replacing the original 47 kΩ resistors, with the exception of the resistor highlighted in blue.
Cartridge Slot Mod
This is probably the most labor-intensive mod, as it requires 44 solder joints within an area no larger than about 10 cm.The first step is to remove the cartridge connector from a broken Mega Drive/Genesis console and locate the chip that must be desoldered from the Sega Radica board.
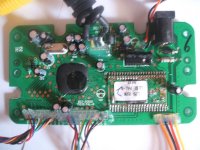
The chip to remove is the one with the Japanese sticker on top. Once it has been desoldered, connect the cartridge slot following the wiring shown below.

Once the installation is complete, your Mini Sega will have a fully functional cartridge slot, allowing you to play original Mega Drive/Genesis cartridges instead of being limited to the small selection of built-in games.
5V Power Supply Mod
Special thanks to user Bertobp.Why would you want the console to run at 5V instead of 3.3V? The main reason is compatibility. A large number of Sega cartridges require a 5V supply to operate correctly. When used at 3.3V, many of these cartridges will simply display a black screen and fail to boot. With this 5V mod, those cartridges will work properly.
To perform this modification, you will need to salvage a 7805 voltage regulator from a Mega Drive/Genesis console. It is located next to a heatsink.
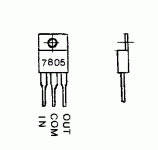
Once you have the regulator, locate the small black voltage regulator IC on your Mini Sega Radica motherboard.
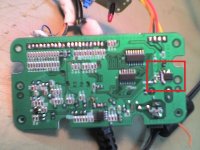
Desolder this component, leaving the board as shown below.

As you can see, there will be three solder points available.
Connect the COM pin to the left pad, IN to the center pad, and OUT to the right pad.
After soldering the regulator in place, it is very important to install a heatsink (the original one from the Mega Drive works perfectly), as the 7805 generates a considerable amount of heat during operation.
This is a delicate step, so make sure that none of the solder joints come into contact with each other, as doing so could damage the console.
Installing DB9 Controller Ports
The DB9 ports are the connectors used by Mega Drive/Genesis controllers. To perform this mod, you will need to remove the DB9 ports from a broken Mega Drive/Genesis console and install them in your Sega Radica.All Street Fighter versions of the Radica console use the same wire color assignment. However, if you have a single-controller Radica model, the color coding may be different. In that case, use the signal names rather than the wire colors.
Looking at the front of the DB9 connector, wire it as shown below.

The following color-to-pin mapping is only valid if the signal names match those listed below:
- MENU → Brown → Not used
- GND → Black → Ground
- P106 → Red
- VDD → Orange → Power
- P102 → Yellow
- P103 → Green
- P104 → Blue
- P105 → Purple
- P100 → Gray
- P101 → White
| DB9 Pin | Wire Color | Signal |
|---|---|---|
| 1 | Gray | P100 |
| 2 | White | P101 |
| 3 | Yellow | P102 |
| 4 | Green | P103 |
| 5 | Orange | VDD |
| 6 | Blue | P104 |
| 7 | Red | P106 |
| 8 | Black | GND |
| 9 | Purple | P105 |
What about the original Radica controllers?
The original Radica controllers are actually of excellent quality, so rather than replacing them, the recommended approach is to solder them to female DB9 connectors using the same wiring shown above. This allows them to be used just like standard Mega Drive/Genesis controllers.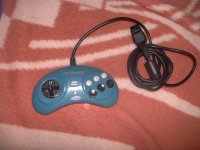
One thing that always bothered me was that I never managed to get it running at 60 Hz. Yesterday I asked ChatGPT whether anyone had ever managed to do it, and that's how I found this forum!
I hope my tutorials help anyone who's interested in modifying this little console!
Has anyone managed to get one of these running at 60 Hz?
I attach a pitcure with my "Mini sega Radica" finished
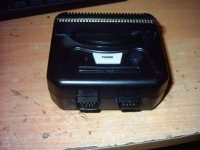
Wow - great info and really cool Mini Sega Radica! Thank you for the tutorials. I believe that Jakks megadrives (e.g. FIFA/NHL) have solder points for NTSC or PAL and would also require the crystal changing. I did the first bit on one of mine but haven't changed the crystal.
When I asked AI about converting the Radica ones, this is what it said were the main problems:
I don't know how true this is - it has a tendency to make stuff up when it doesn't know! Probably the easiest thing to do is buy one from the US and do the other mods on that instead!
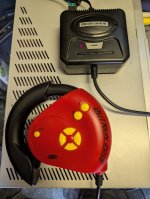
The other Radica unit I got recently I really love - Outrun 2019. This game totally passed me by when it originally came out on the Mega Drive (I think I assumed it wouldn't be any good), but it's actually a great game. Amazing graphics for a driving game on the MD, excellent tunes, and very fast and somewhat challenging gameplay. The weird controller actually works quite well. It's not analogue, but the game didn't support that anyway.
When I asked AI about converting the Radica ones, this is what it said were the main problems:
- The "Glob-Top" Problem: Radica units do not use standard packaged microchips with exposed legs. The entire console hardware is shrunk down onto a piece of silicon bonded directly to the motherboard, then covered in a hard black epoxy blob (a "glob-top"). You cannot solder to or cut pins on the chip because the chip pins do not exist.
- Hardcoded ASIC Logic: The System-on-a-Chip (SoC) used by Radica was custom-ordered from a factory specifically for the PAL region. The clock dividers and video encoding logic (which dictate the 50Hz timing and PAL color subcarrier) are permanently etched into the silicon under that epoxy.
- No Analog Video Sub-Chips: In standard consoles, an independent Sony or Samsung video encoder chip handles the final PAL/NTSC signal. In the Radica, this logic is entirely internal to the main SoC. There is no external chip to swap or rewire. [1]
I don't know how true this is - it has a tendency to make stuff up when it doesn't know! Probably the easiest thing to do is buy one from the US and do the other mods on that instead!
The other Radica unit I got recently I really love - Outrun 2019. This game totally passed me by when it originally came out on the Mega Drive (I think I assumed it wouldn't be any good), but it's actually a great game. Amazing graphics for a driving game on the MD, excellent tunes, and very fast and somewhat challenging gameplay. The weird controller actually works quite well. It's not analogue, but the game didn't support that anyway.
Last edited:
Apietoteae
Newbie
- Credits
- 1CR
What a great version you have! OutRun is such a fun game!
I think it's about time I dusted off my old Sega Radica and took another look at how to change its video frequency.
I've wanted to solve this for a long time. I have two perfect consoles to study: the NTSC Street Fighter version and its PAL counterpart.
I'm going to open both boards and compare them to see if I can find a jumper or any other difference that controls the video mode. I'll post everything I discover, along with photos of both PCBs, here on the forum.
Hopefully I'll find some time tonight or tomorrow to take a first look and snap plenty of pictures!
I think it's about time I dusted off my old Sega Radica and took another look at how to change its video frequency.
I've wanted to solve this for a long time. I have two perfect consoles to study: the NTSC Street Fighter version and its PAL counterpart.
I'm going to open both boards and compare them to see if I can find a jumper or any other difference that controls the video mode. I'll post everything I discover, along with photos of both PCBs, here on the forum.
Hopefully I'll find some time tonight or tomorrow to take a first look and snap plenty of pictures!