You are using an out of date browser. It may not display this or other websites correctly.
You should upgrade or use an alternative browser.
You should upgrade or use an alternative browser.
The Electrocoin owners thread
- Thread starter _Matt_
- Start date

They seem reasonably priced, surprised they are still available.
wondering if anyone has any documentation of this Caninet being used by Electrocoin at a trade show ?
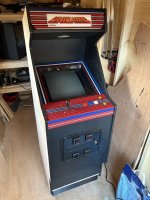
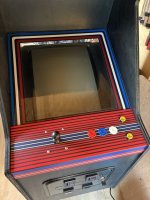
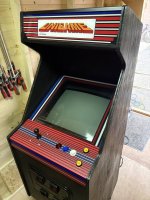
Definetely an Electrocoin built cabinet (poss originally Lethal enforcers 1 ??)
Converted with a very nice genuine kit including Marquee(Plexi , side art, cpo ) board also and Hantarex monitor. finished to a very night standard and picked up with other Electrocoin cabinets earlier in year.
Definetely an Electrocoin built cabinet (poss originally Lethal enforcers 1 ??)
Converted with a very nice genuine kit including Marquee(Plexi , side art, cpo ) board also and Hantarex monitor. finished to a very night standard and picked up with other Electrocoin cabinets earlier in year.

Cheers mate!
Looks like Deith Leisure were the distributor. I have not seen a full kit on a cabinet before which is surprising.
Last edited:
Some recent stateside pick ups


Last edited:
They look in decent nick but LCD monitors I think. I have one and the CRT protrudes out of the back a couple inches with a plastic cover like the old Sega mini uprights. Looks like one has been covered with wood and the other a replacement door.
Its a good job one of those Dlx Full Throttle/Chase HQ cabs didn't come up for sale over here else I'd even less room than I have now

some of my fav games there
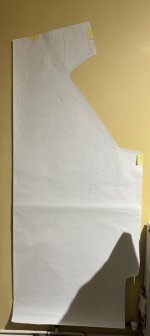
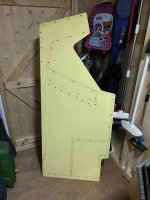
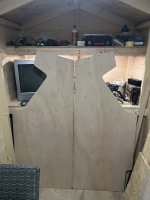
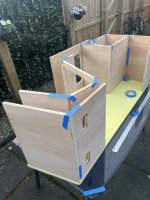
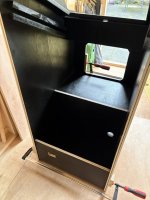
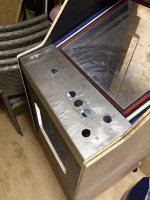
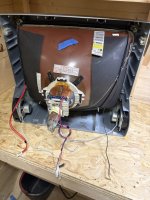
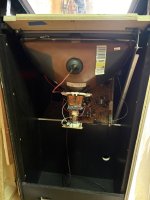
Hi, folks. I posted this on FB ukvac, thought i would post this here too, even though this is not a real electrocoin machine, hope thats ok. Been working for the last 6 months nearly, on completing this cabinet. A kind owner gave me some measurements of a genuine midi cabinet, and i set about making my own. Plans were drawn up, and i think they are pretty close. Using 18mm ply, with dowel's. Just like the real ones were put together as far as i can tell. All cut by myself, so hard to get straight cuts on anything using a jig saw and an old circular saw, but it worked out ok and everything fitted ok. The yellow panel is my template, which i used to make sure all the holes matched on both sides, plus all the dowel marks for the inside boards. Graphics courtesy of Oliver at Arcade Art Shop of course, great quality as always. Running a pi5 with a rgb-pi gen2 scart lead, into a consumer 20in crt tv. The crt gave me some issues with it being quite fragile, and heavy, but i got the bezel cut out in the end, and the pcb is supported with a thin mdf sheet, so far this has worked really well, and im able to remove it and mount it either horizontal or vertical.
Overall, a thoroughly enjoyable project, highly recommended to anyone.
Anyway, enjoy the pics, i took over 300! while documenting this build so this is just a few of the best ones.
Thanks.
Overall, a thoroughly enjoyable project, highly recommended to anyone.
Anyway, enjoy the pics, i took over 300! while documenting this build so this is just a few of the best ones.
Thanks.
Attachments
-
 IMG_6047.jpg22.8 KB · Views: 10
 -
 IMG_6244.JPG78.6 KB · Views: 10
 -
 IMG_6248.JPG60.8 KB · Views: 10
 -
 IMG_6269.JPG67.6 KB · Views: 10
 -
 IMG_6341.JPG82.7 KB · Views: 8
 -
 IMG_6478.JPG101.1 KB · Views: 7
 -
 IMG_6552.JPG89.1 KB · Views: 7
 -
 IMG_6735.JPG81.9 KB · Views: 8
 -
 IMG_6741.JPG81.3 KB · Views: 11
 -
 IMG_6744.JPG87.2 KB · Views: 11
Hi, folks. I posted this on FB ukvac, thought i would post this here too, even though this is not a real electrocoin machine, hope thats ok. Been working for the last 6 months nearly, on completing this cabinet. A kind owner gave me some measurements of a genuine midi cabinet, and i set about making my own. Plans were drawn up, and i think they are pretty close. Using 18mm ply, with dowel's. Just like the real ones were put together as far as i can tell. All cut by myself, so hard to get straight cuts on anything using a jig saw and an old circular saw, but it worked out ok and everything fitted ok. The yellow panel is my template, which i used to make sure all the holes matched on both sides, plus all the dowel marks for the inside boards. Graphics courtesy of Oliver at Arcade Art Shop of course, great quality as always. Running a pi5 with a rgb-pi gen2 scart lead, into a consumer 20in crt tv. The crt gave me some issues with it being quite fragile, and heavy, but i got the bezel cut out in the end, and the pcb is supported with a thin mdf sheet, so far this has worked really well, and im able to remove it and mount it either horizontal or vertical.
Overall, a thoroughly enjoyable project, highly recommended to anyone.
Anyway, enjoy the pics, i took over 300! while documenting this build so this is just a few of the best ones.
Thanks.
Attachments
-
 IMG_6927.JPG98.6 KB · Views: 11
 -
 IMG_7022.JPG76.6 KB · Views: 10
 -
 IMG_7153.JPG100.2 KB · Views: 10
 -
 IMG_7247.JPG77.3 KB · Views: 9
 -
 IMG_7276.JPG67 KB · Views: 10
 -
 IMG_7379.JPG98.4 KB · Views: 12
 -
 IMG_7380.JPG102.4 KB · Views: 12
 -
 IMG_7385.JPG96.3 KB · Views: 11
 -
 IMG_7424.JPG108.5 KB · Views: 10
 -
 IMG_7482.JPG84.4 KB · Views: 10
Thanks fellas. To be honest, i would say im handy enough with wood, i had built a cabinet before but it was more of a mame machine, nothing like this no compromise jamma replica. I had the idea in my head of how it would go together, and i just winged it really I just loved the midi shape and size, it turned out better than i could ever have wished for to be fair.
I just loved the midi shape and size, it turned out better than i could ever have wished for to be fair.You have done a great job , not surprised you are pleased.Thanks fellas. To be honest, i would say im handy enough with wood, i had built a cabinet before but it was more of a mame machine, nothing like this no compromise jamma replica. I had the idea in my head of how it would go together, and i just winged it really
Thanks for posting on here I thought it would be received warmly in this thread when I suggested it!